
Frequently Asked Questions

What If I Forget or Don't Know My Password?
You can request a Password Reset from the Login page.
Login Page
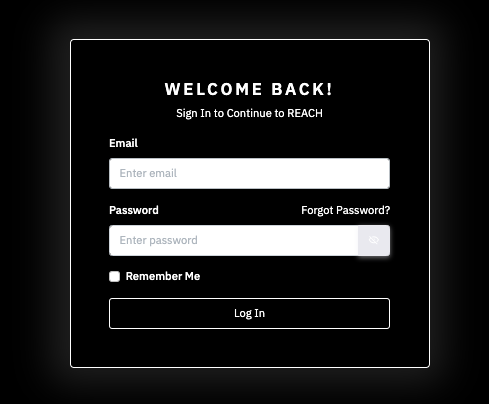
From the Login screen, you can click the Forgot Password? link. That will direct you to a page with this form:
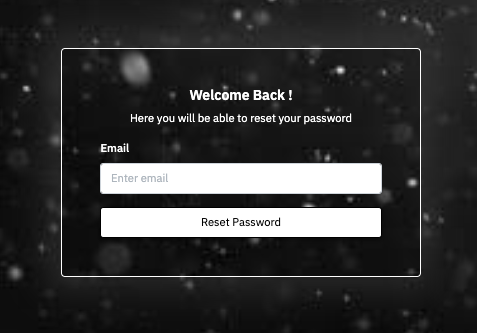
Enter your Email in this form and click Reset Password. If the email address matches a User record in our system, you will receive an email with a link to reset your password. Please make sure to check you Spam folder if you don't see the email.
If the email doesnt match a User record in our system, you will get an error message. In that case, you can contact us and we can get you assistance.
How Do I Create a Subscription?
Subscriptions are created on the Shop page inside of REACH. In order to create a subscription, you have to already have a User and Client record inside of our system. If you don't already have access, please contact us.
REACH Shop
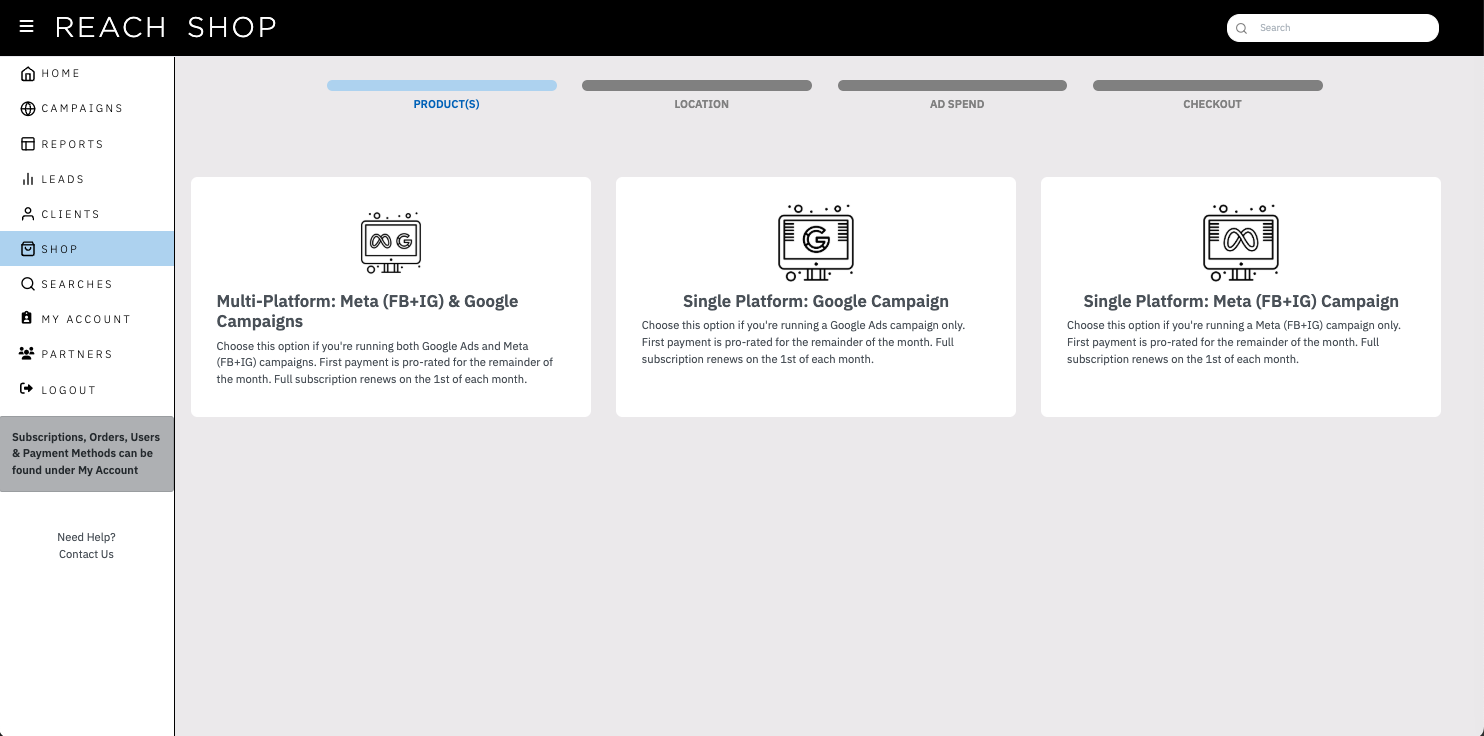
- Go to the SHOP page
- The products available to you will be displayed here. Available products vary based on a number of factors, but our standard products are the Digital Marketing campaigns shown here.
- Select the product that matches the Platforms you would like to set up (typically: Meta, Google, or Both)
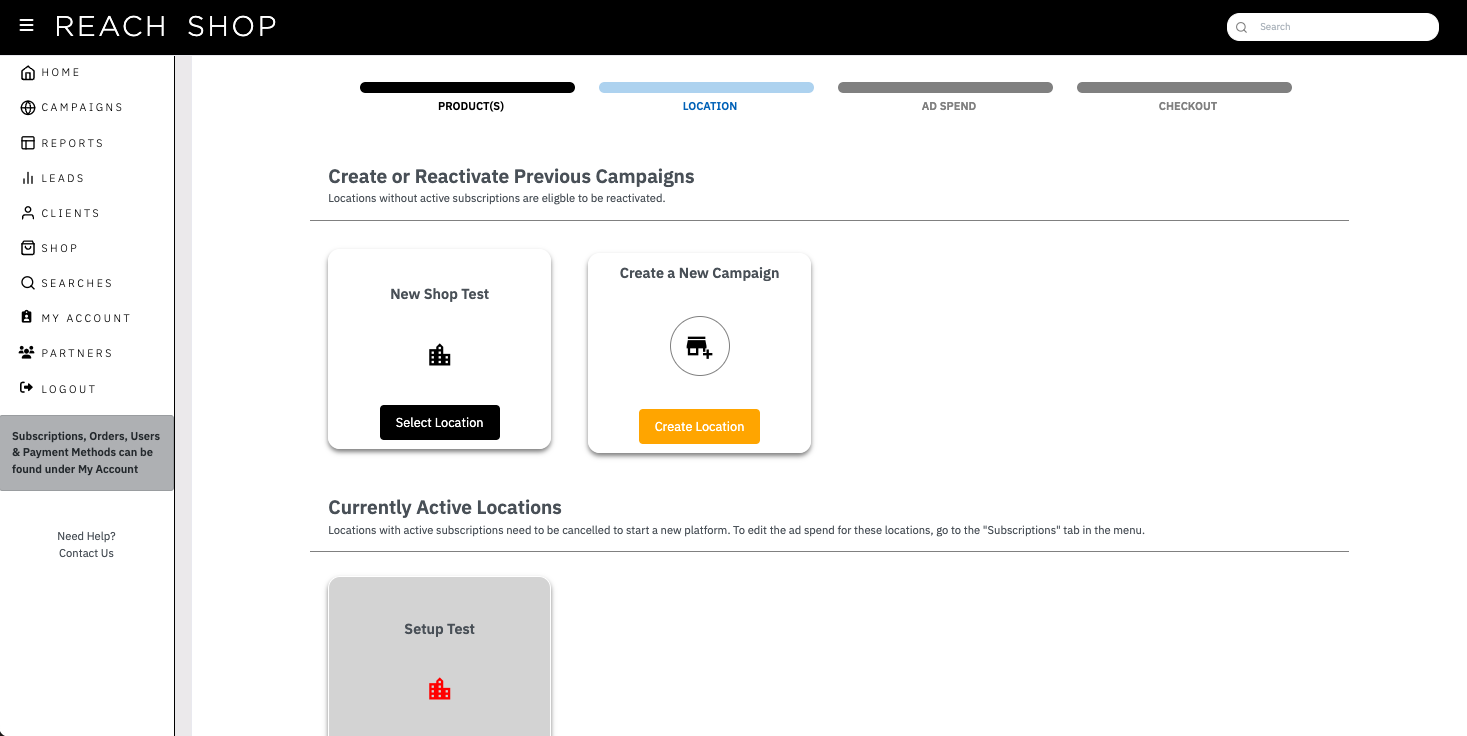
- Once you select the product, you will select which Location you are setting up this Subscription for.
- If this is your first Location with us, you will only see the "Create a new Campaign" box.
- If you have previously run the Location with us and want to start the Subscription back up for that Location, you can select it in the top section of this page.
- Locations with a currently Active subscription will be shown in the bottom section of this page, and cannot have a new subscription created for them. If you need to make changes to an existing location's subscription, see "How Do I Manage My Subscriptions?" on this page.
- If you want to Add or Remove a platform (Meta or Google) from an existing subscription, please contact your Digital Marketing Specialist.
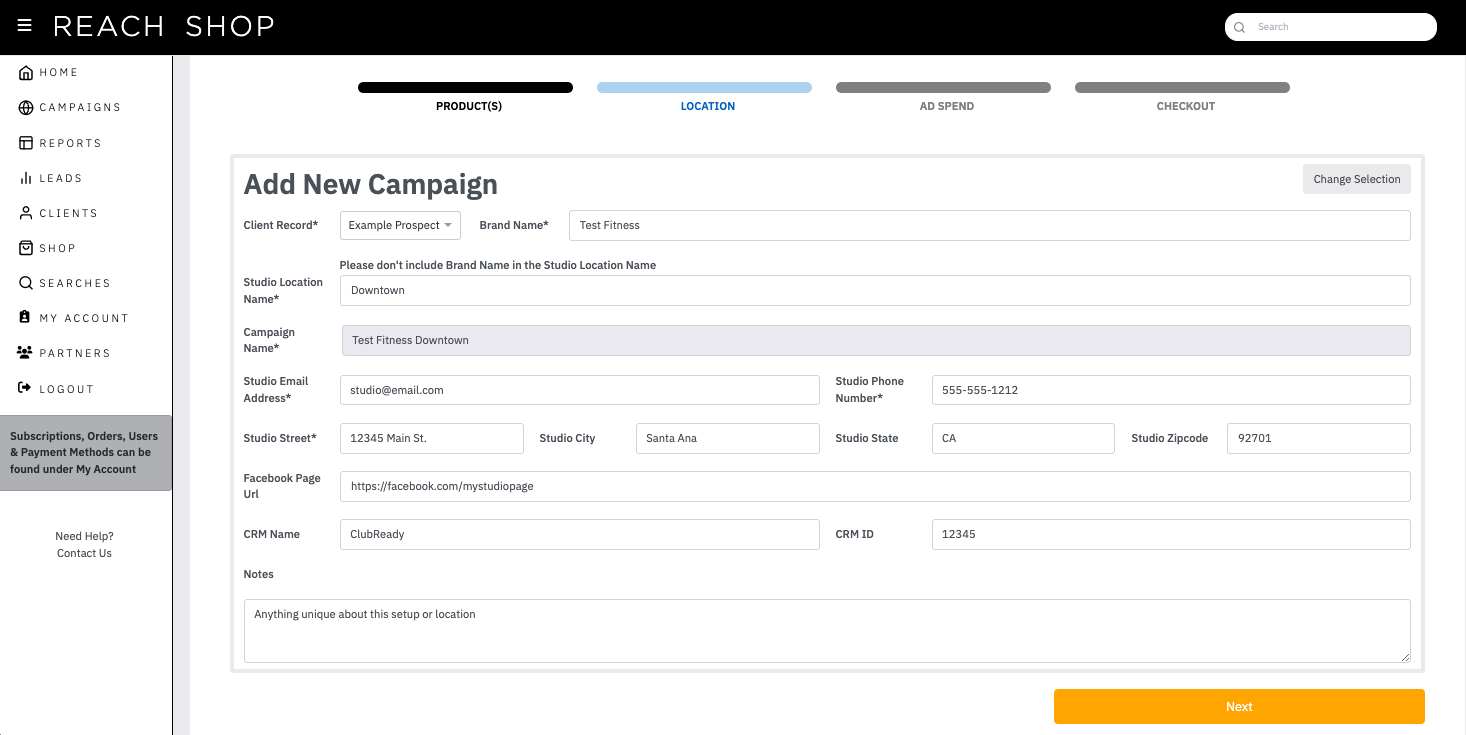
- If you are adding a New Location, you will be taken to this page. If you selected a previously run Location, skip to the next section.
- Select the Client Record from the drop down. In most cases there will only be one Client record, but in some instances a User will have access to multiple Client records.
- Once you select the Client Record, the Brand Name should auto populate based on that Client record.
- Enter the Studio Location Name. This is often the city the location is in, but can also be a region or a special area of town (Downtown, West End, etc.).
- The Campaign Name used throughout our system is a combination of the Brand Name and the Location Name fields. This will be displayed in the Campaign Name section, which is not editable. If needed, you can edit the Brand Name or Location Name fields so that the Campaign Name looks correct.
- Fill out the remaining fields in this form.
- If you are running a Meta campaign, please provide your Facebook Page URL.
- The CRM Name field is typically used to let us know what system you use to follow up with your leads or manage your memberships. Common CRMs include ClubReady and Mindbody, but there are many others.
- If your CRM has specific IDs for each location, please provide the ID for the location you are setting up.
- The Notes field can be used to communicate anything you'd like about this location.
- If you accidentally clicked on New Campaign but you instead want to Reactivate a location that has already run with us, you can click the Change Selection button on the top right to go back to the previous page.
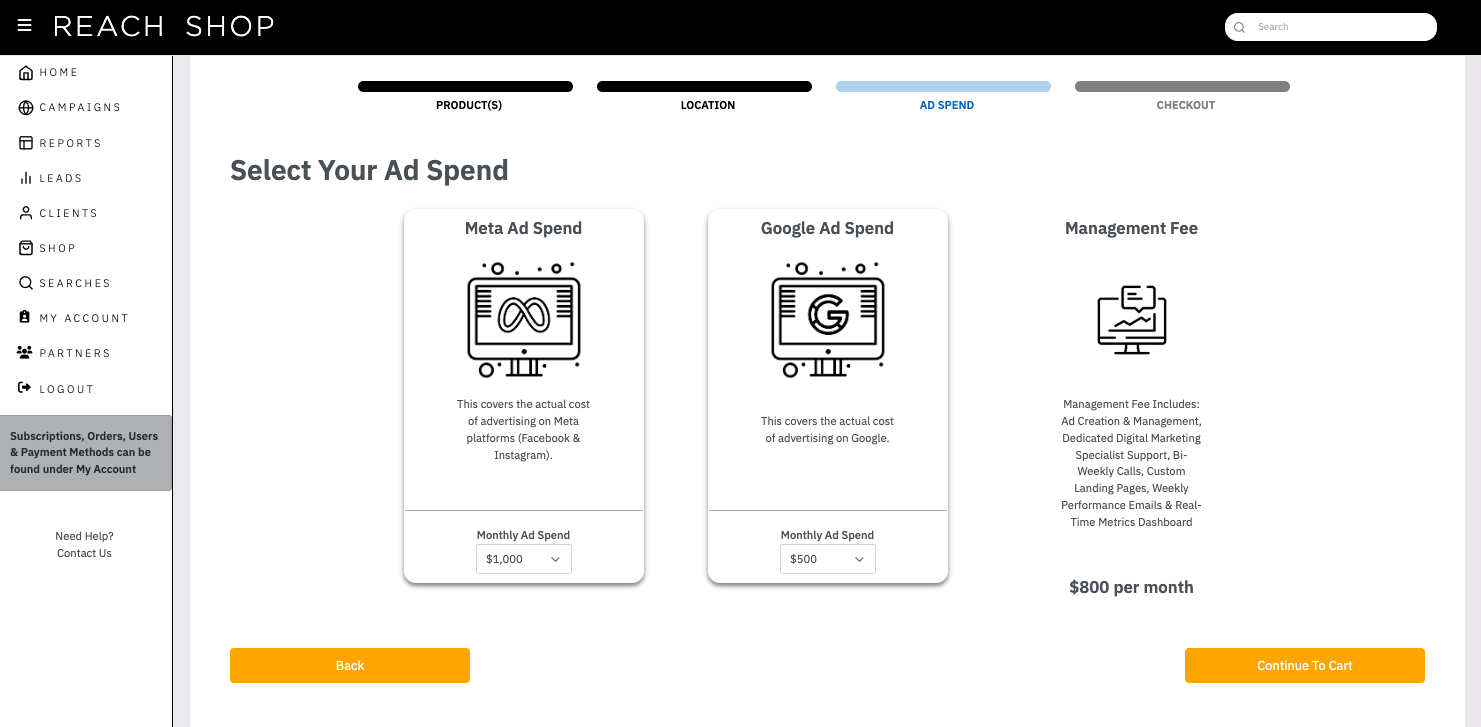
- Whether you created a new location or selected an existing one, you will then be taken to this page to select your Ad Spend Amounts.
- Based on the product you selected, you will see the options for Ad Spends.
- Click the drop down to select your desired Monthly Ad Spend.
- Your Management Fee will be displayed here. This is based on the product selected and cannot be changed.
- Once you are happy with the Ad Spends selected, click Continue To Cart.
- Based on the product you selected, you will see the options for Ad Spends.
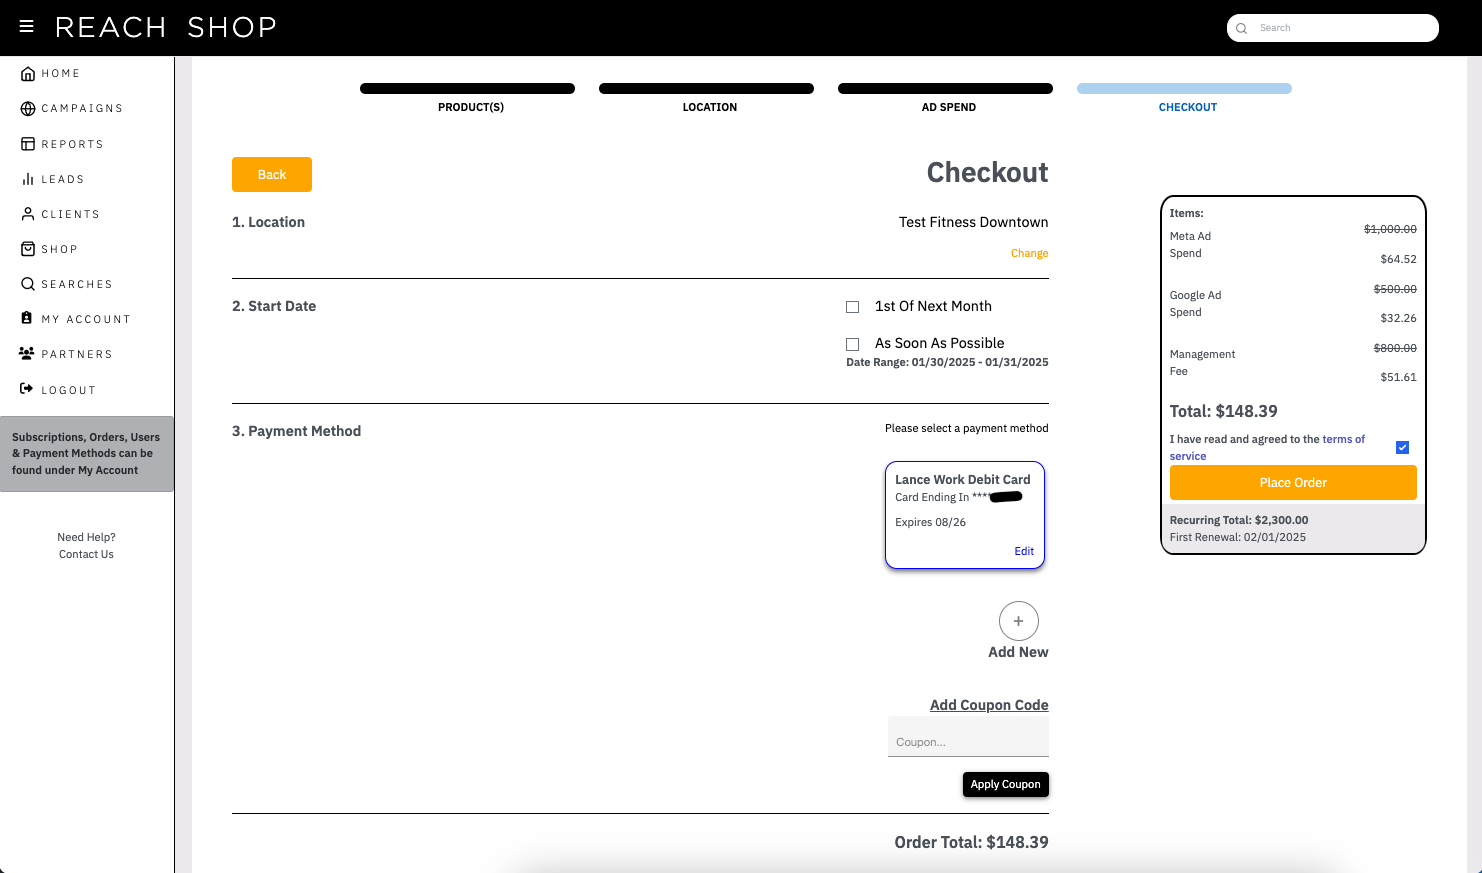
- The final page is the Checkout.
- Start Date: Select whether you would like to start on the 1st of Next Month or As Soon As Possible.
- If you select the 1st of Next Month, you won't be charged anything at this time. We will start on your setup process, but nothing will go Live until the 1st. You will be charged the full subscription amount on the 1st of the next month.
- If you select As Soon As Possible, you will be charged a prorated amount for the rest of this month. We will get your campaign set up and started as soon as possible, and your prorated ad spend will be spent this month. On the 1st of the next month, you will be charged your full subscription amount.
- Payment Method
- If you have a saved Payment Method in your account, it will show up here. If you have many saved payment methods, they will all be here but you may need to scroll to see them all.
- If you want to use a saved Payment Method, select it.
- If you need or want to add a new Payment Method, click the + button.
- Fill out the Payment Method information and click Save.
- If you have any questions about the Payment Method window, see the "How Do I Manage My Subscriptions?" section of this page.
- Fill out the Payment Method information and click Save.
- If you have a saved Payment Method in your account, it will show up here. If you have many saved payment methods, they will all be here but you may need to scroll to see them all.
- If you have any Coupon Codes that were provided to you, you can enter them here (this is rare).
- Make sure to click Apply Coupon to ensure the coupon has been applied.
- When the coupon has been applied, you will see a message below the button that says "Coupon Applied". You sometimes have to click the Apply Coupon button a second time in order for it to be correctly applied.
- Make sure to click Apply Coupon to ensure the coupon has been applied.
- The right hand section of the page will give you a full recap of your current order and recurring subscription.
- The Total is what you will be charged today.
- The Recurring Total is what you will be charged on the 1st of the next month.
- If you do have a Coupon, these aren't factored into the recurring total as they may or may not persist on a subscription.
- You can always speak with your Digital Marketing Specialist or Business Development representative about any coupons applied to your subscription.
- If you do have a Coupon, these aren't factored into the recurring total as they may or may not persist on a subscription.
- Finally, check to box to accept our Terms of Service.
- You can click the terms of service link to open our Terms in a new window to review them.
- If the Start Date, Payment Method, Coupons, or Terms of Service aren't properly selected and applied, the Place Order button will remain Gray. Once all are selected properly, the button will turn Orange and you can Place your Order.
- If there are no issues with the initial order, you will be shown an Order Confirmation screen.
- You will be emailed a receipt of your Order. If you want, you can also download it directly from this page.
- If there is a problem with the order, there will be a message stating that an error occurred. You can view the Order from your My Account page to see what the issue was so you can get it corrected. See the "How Do I Manage My Subscriptions?" section on this page for more information.
- If there are no issues with the initial order, you will be shown an Order Confirmation screen.
- Our team will then get started on setting up your campaign, and your Digital Marketing Specialist will be in touch shortly!
- Start Date: Select whether you would like to start on the 1st of Next Month or As Soon As Possible.
How Do I Manage My Subscriptions?
You can manage Subscriptions, Orders, and Payment Methods from the My Account page.
Payment Methods
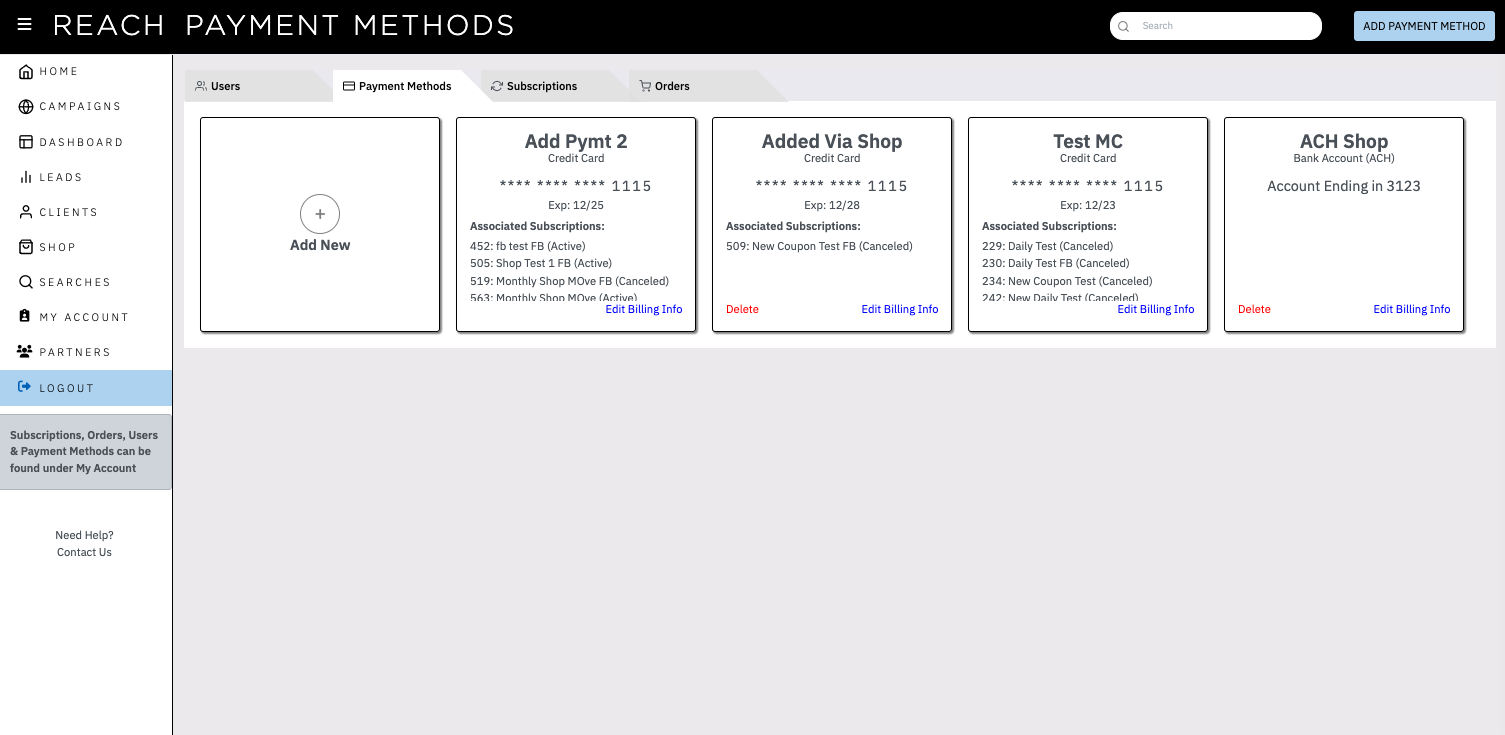
The Payment Methods page is only available to Owners and Subscription Employees. It allows you to view and manage the payment methods you have added to the system. Each payment method will display its Nickname as well as the payment method Type – Credit Card or Bank Account (ACH), and its basic details. It will also display the Subscription(s) that are associated with that payment method (if there are more subscriptions than fit in the field, you can scroll inside that field).
From this page, you can Add a New Payment Method, Delete a Payment Method, or Edit the Billing Information such as Name, Address, and Nickname (you cannot Edit a payment method to change it to a different card or change it to ACH – to do that, you need to Add a New payment method).
In order to Delete a payment method, that payment method cannot be associated with any Active subscriptions. If you don’t see the Delete button then you will need to Edit any Active subscriptions that are using that payment method to use a different payment method.
Editing or Adding a Payment Method will open up the following window:
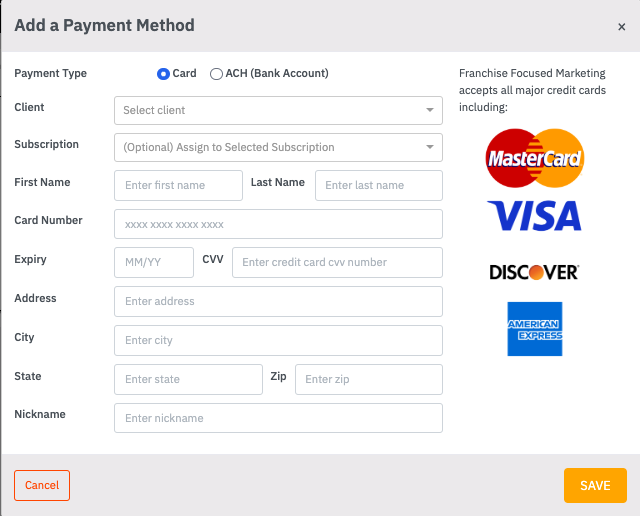
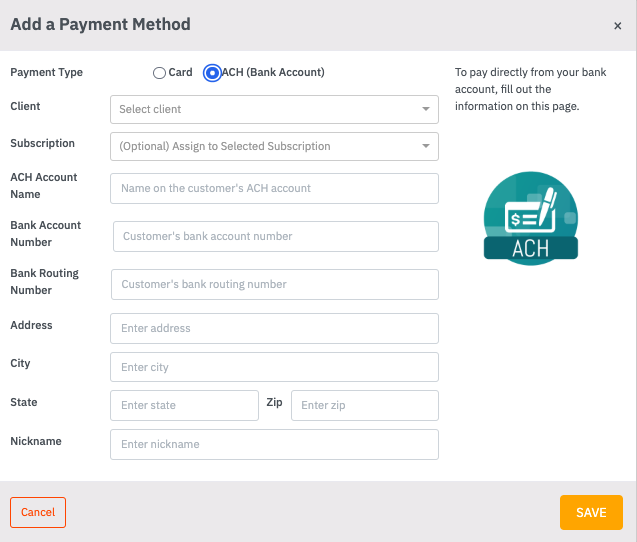
- When adding a new Payment Method, select the Payment Type – Credit Card or ACH (Bank Account).
- Select the Client record you want this Payment Method associated with. There is typically only one, but in certain situations you may have access to more than one Client record.
- Optionally, select a Subscription to assign this new payment method to (only Active subscriptions, including those with Payment Errors, are available to select). Only one subscription can be assigned when a payment method is added.
- Then fill out the remaining fields.
- The Nickname field will give you an easy way to identify this Payment Method throughout the system.
- If you want to assign a payment method to a subscription, you can do so from the Payment Methods page. You can also change the payment method when viewing a Subscription or Order.
- Use the Edit Billing Info button to bring up the Edit window, and select the subscription you want to update.
- Click Save and it will update that subscription to use the selected payment method.
Subscriptions
The Subscriptions Tab shows a list of Subscriptions you have access to. Clicking on a Subscription will take you to the details page shown here:
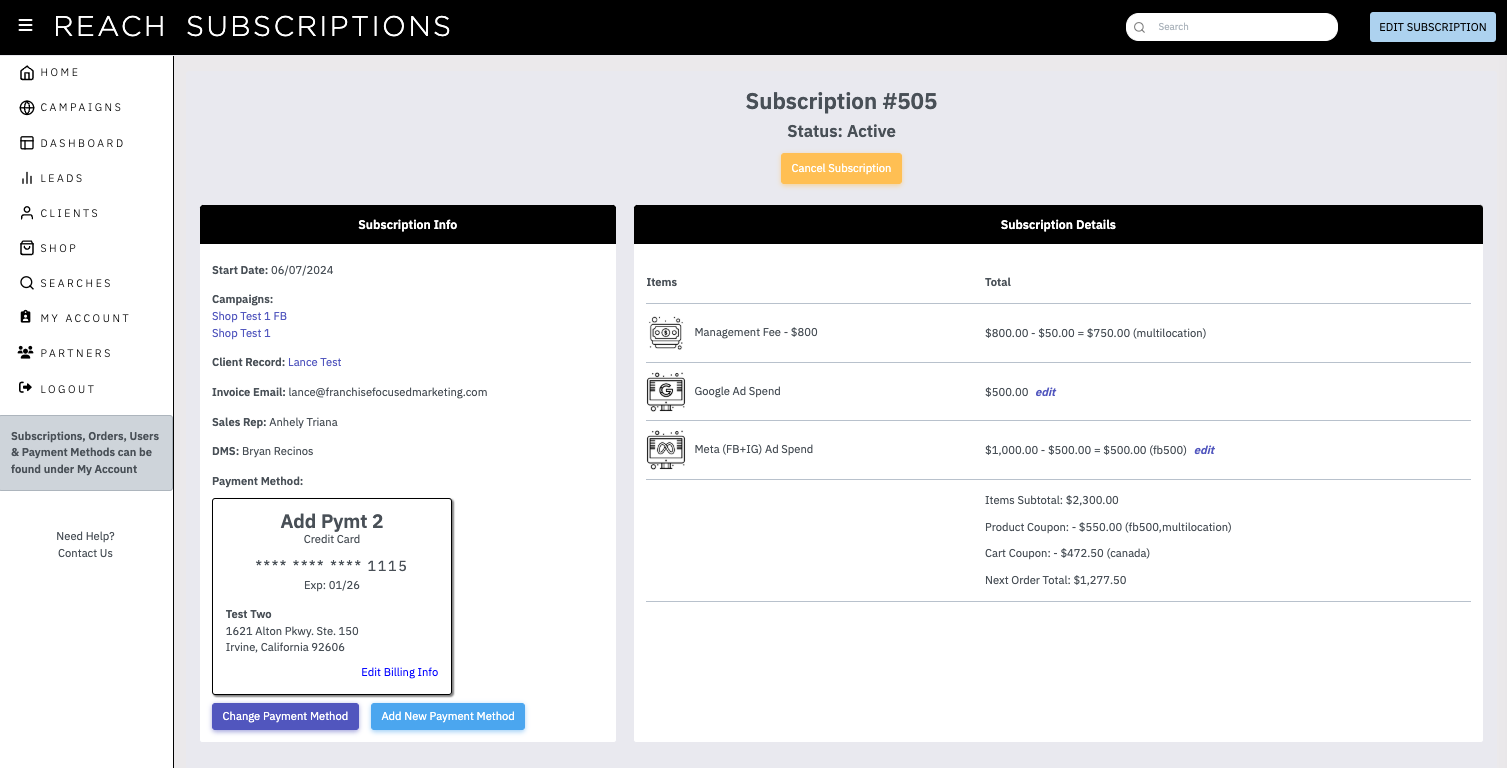
- You can change the Payment Method or Ad Spend amounts by clicking the Edit Subscription button in the top right of the page.
- You can Edit just the Ad Spend amounts by clicking the blue edit link next to any Ad Spend.
- You can Change just the Payment Method by clicking the purple “Change Payment Method” button.
- This will allow you to select a Payment Method you have previously added to your account.
- You can Add a New Payment Method by clicking the blue “Add New Payment Method” button.
- This will allow you to create a new payment method from this page and immediately assign it to this Subscription. The Payment Method window is the same as in the Payment Methods section above.
- You can click Edit Billing Info to edit the existing payment method's Billing Information such as Name, Address, and Nickname (you cannot Edit a payment method to change it to a different card or change it to ACH – to do that, you need to Add a New payment method).
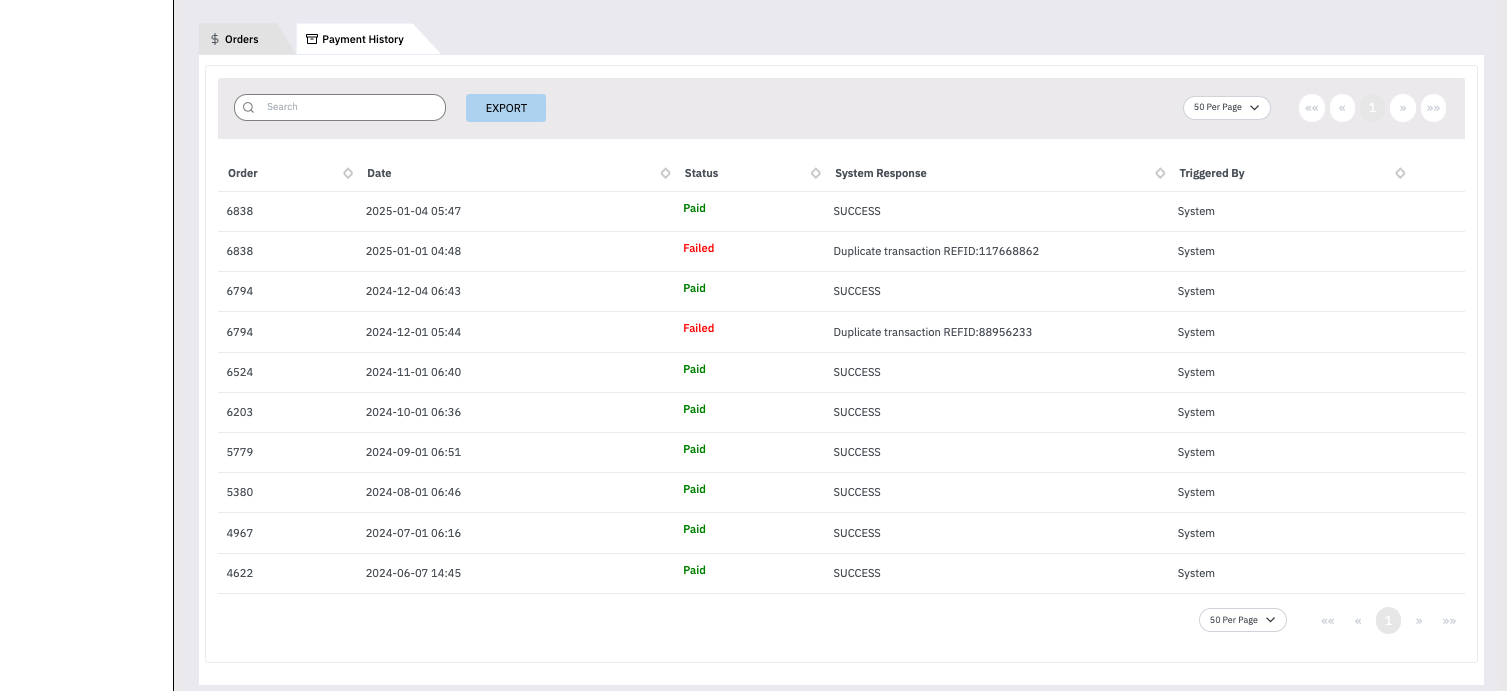
Orders
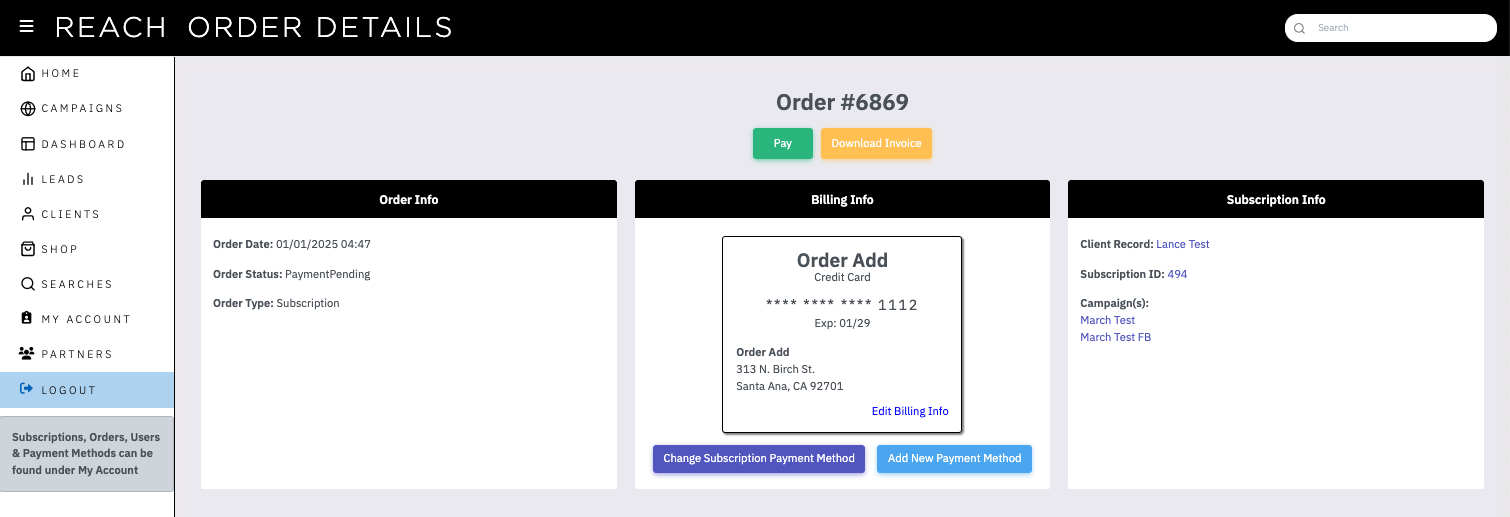
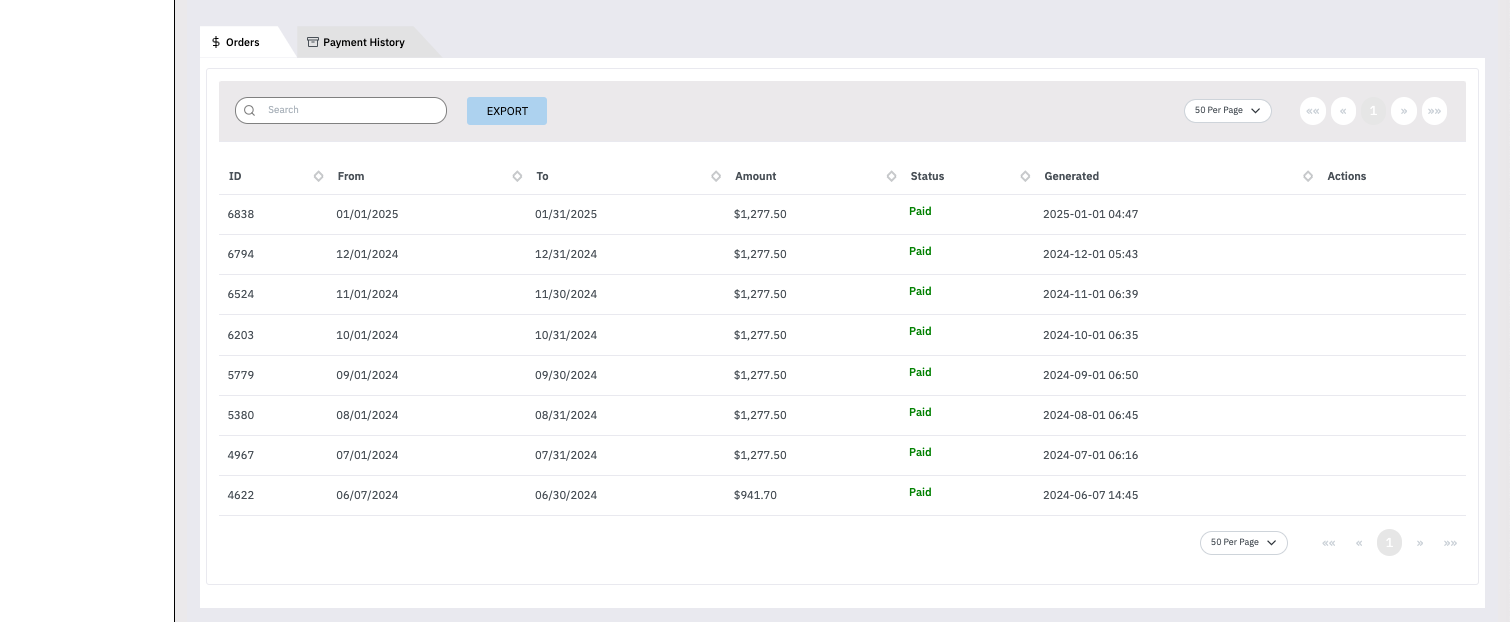
All Orders use the information from the subscription they are tied to in order to process all payments. The Billing Info and Subscription Info boxes contain this information.
- If the Order failed for any reason, you will see a green “Pay” button. If the payment failure reason has been resolved, you can click the Pay button to try and process the Order again.
- You can Change the Payment Method associated with the Order’s subscription by clicking the purple “Change Subscription Payment Method” button.
- This will allow you to select a Payment Method you have previously added to your account.
- You can Add a New Payment Method by clicking the blue “Add New Payment Method” button. This will allow you to create a new payment method from this page and immediately assign it to this Order’s subscription.
- You can click Edit Billing Info to edit the existing subscription's payment method Billing Information such as Name, Address, and Nickname (you cannot Edit a payment method to change it to a different card or change it to ACH – to do that, you need to Add a New payment method).
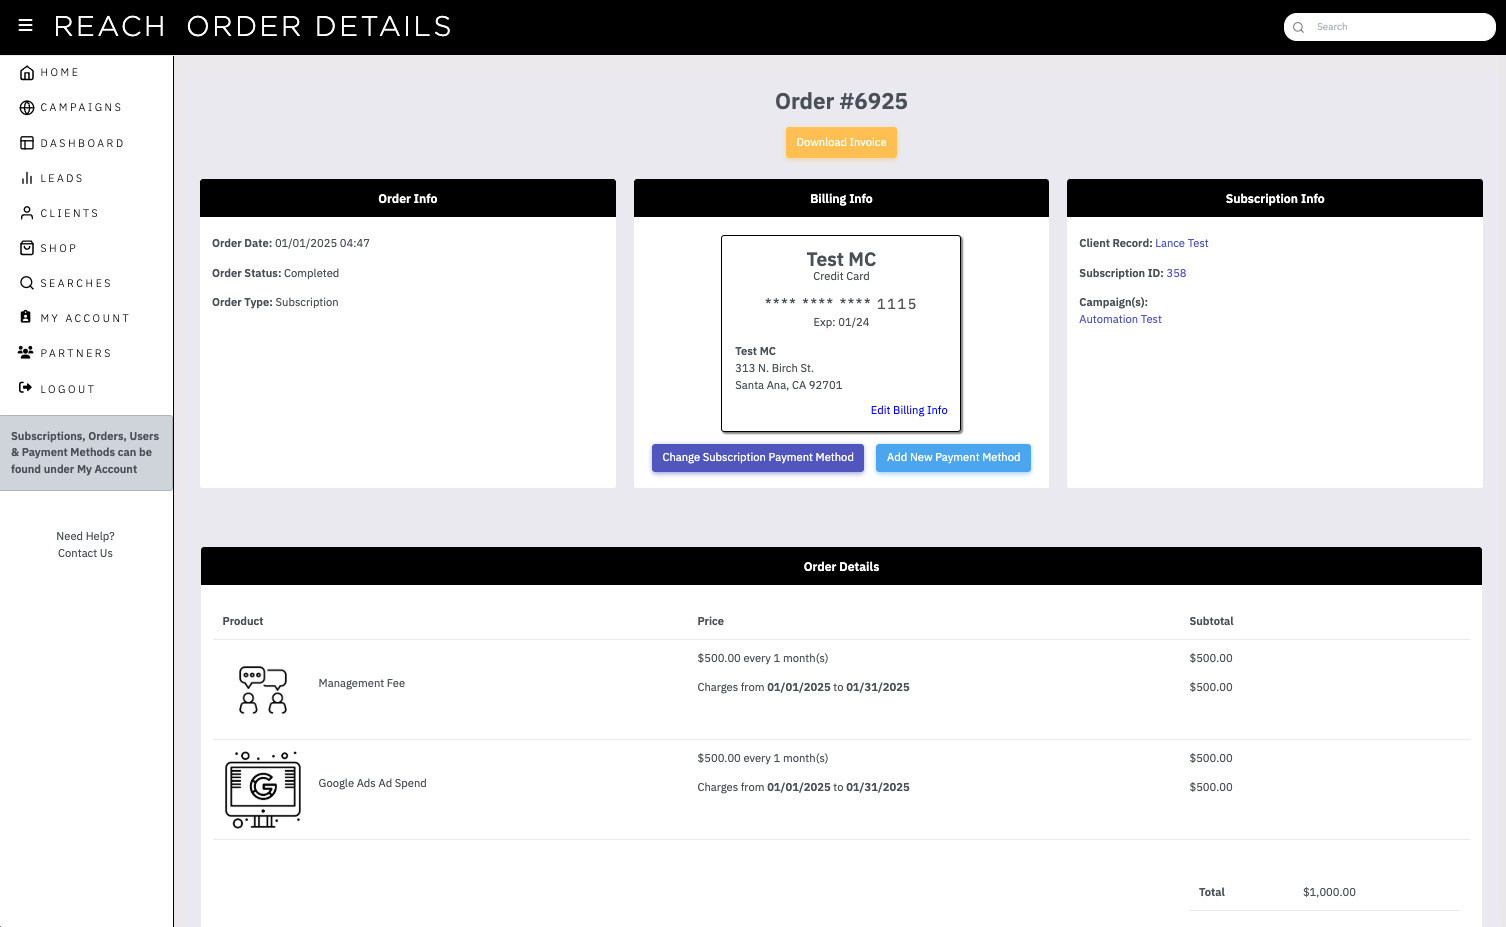
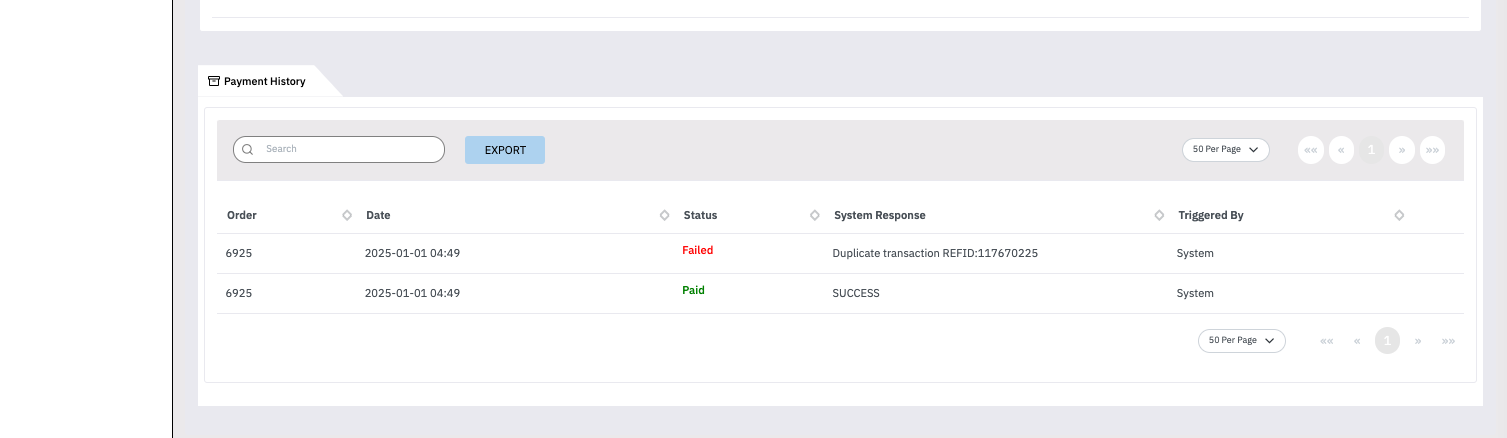
The Order Details section will show the specific Products charged on the order as well as any coupons or discounts applied to the order.
How Do I Edit My User Account?
You can edit your User record from the My Account page. If you have the ability to Add or Manage other User records, you can also do that from the Users tab under My Account.
Users
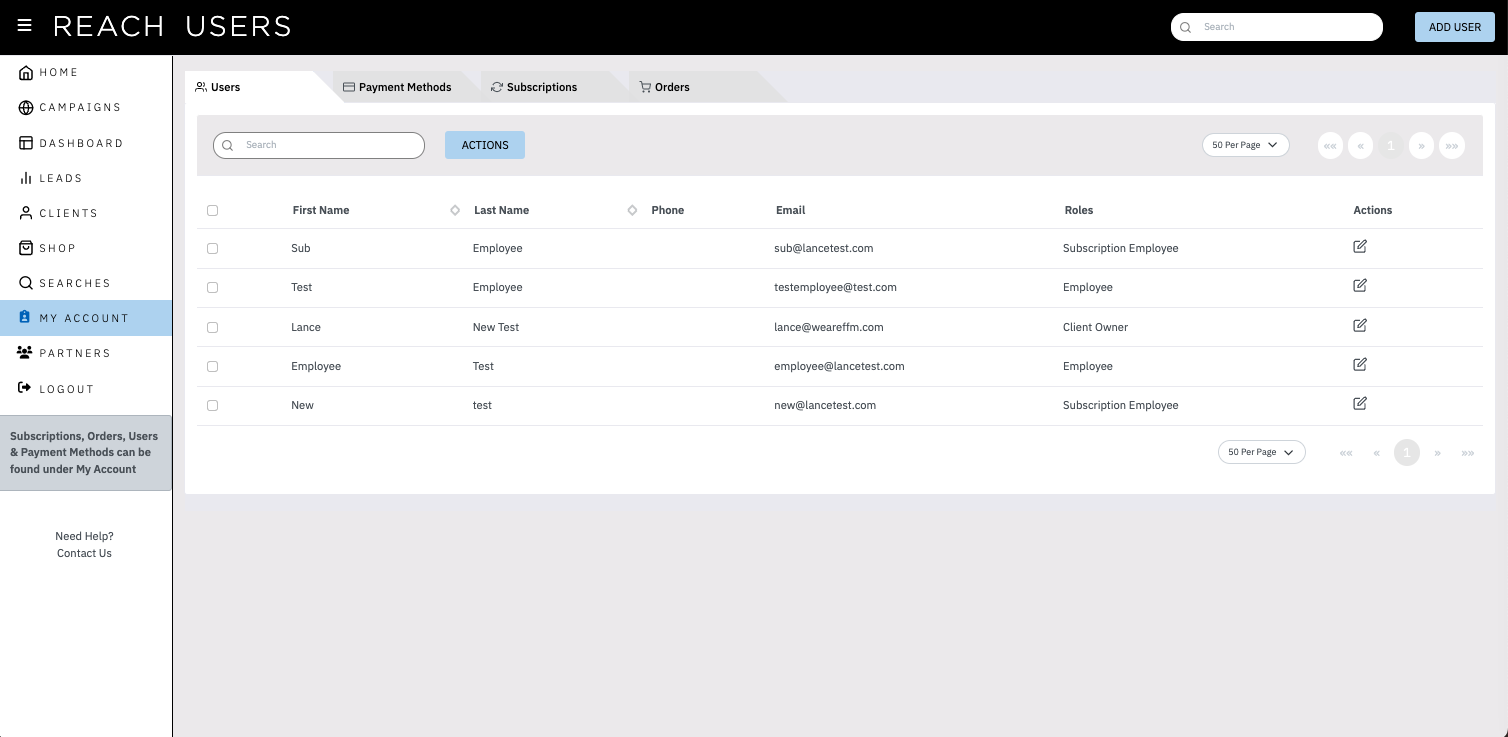
You can use the User tab to edit your own user record to change your login email or password. Just click anywhere on your User record or click the Edit icon under the Actions column all the way on the right. If you have access to create new Users, you will see the Add User button on the top right and the Actions button will have an Add User option. Editing or Adding a User will open up the following window:
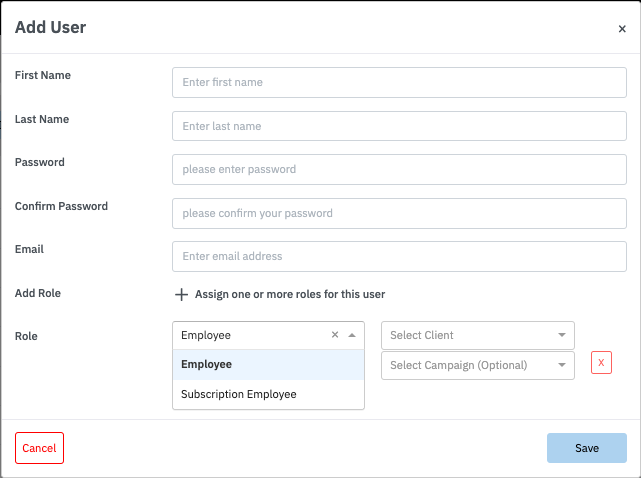
- When adding a new User, all fields are all required. Make sure to click the + button to assign a Role to the user.
- The standard Roles available are “Employee” and “Subscription Employee”.
- An Employee can view all Campaigns they are assigned to, as well as the Leads those Campaigns have generated. They can view the Subscriptions for the Campaigns they are assigned to, but cannot Add, Edit or Cancel them. They can also view all Orders from those Subscriptions. Employees have no access to Payment Methods.
- A Subscription Employee can do all the things an Employee can, and additionally can Add, Edit or Cancel Subscriptions, Pay a failed Order, and can Add, Edit or Delete Payment Methods.
- The standard Roles available are “Employee” and “Subscription Employee”.
- Each Role must be assigned to a Client record, and can optionally be assigned to specific Campaign(s).
- If you select only the Client record, they will have access to all Campaigns under that Client record.
- If you select a Campaign, they will have access to only that Campaign. In order to give access to multiple Campaigns, just click the + button to add another Role. Select the Role, Client record and Campaign you want to give additional access to. This can be repeated for as many Campaigns as you want to give access to.